


OFF
GO LOCAL
| Company | Stock | Price |
|---|---|---|


MIKROE-2609
20 g
Status:
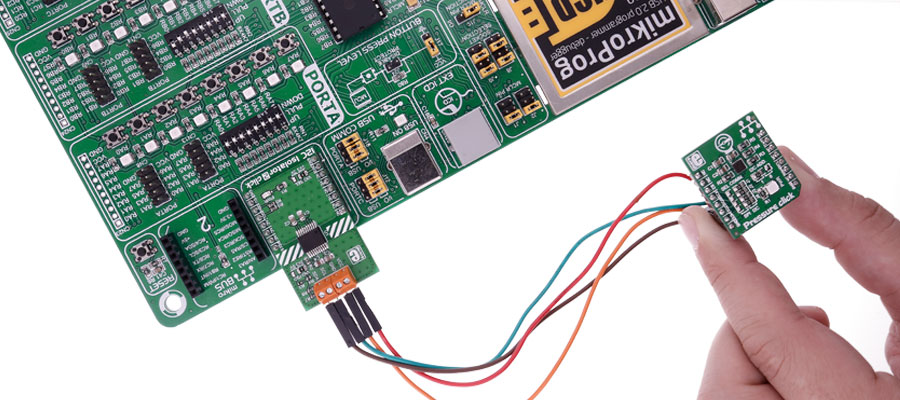
I2C Isolator 2 click provides I2C lines and power isolation for slave devices. It carries the ADM3260 dual I2C isolator with an integrated DC-to-DC converter. I2C Isolator 2 click is designed to run on either 3.3V or 5V power supply.
The click communicates with the target microcontroller over an I2C interface with additional functionality provided by the PWM pin on the mikroBUS™ line.
This product is no longer in stock
Availability date:
OFF
| Company | Stock | Price |
|---|---|---|
I2C Isolator 2 click provides I2C lines and power isolation for slave devices. It carries the ADM3260 dual I2C isolator with an integrated DC-to-DC converter, from Analog Devices. I2C Isolator 2 click is designed to run on either 3.3V or 5V power supply. The click communicates with the target microcontroller over an I2C interface with additional functionality provided by the PWM pin on the mikroBUS™ line.
The ADM3260 is a hot-swappable digital and power isolator with two nonlatching, bidirectional communication channels, supporting a complete isolated I2C interface, and an integrated isolated dc-to-dc converter, supporting up to 150 mW of isolated power conversion.
The bidirectional I2C channels eliminate the need for splitting I2C signals into separate transmit and receive signals for use with standalone optocouplers.
The screw terminal on the board can be connected to I2C and power connections of an I2C slave device.
Type
I2C,Isolators
Applications
Isolated I2C, SMBus, and PMBus interfaces, multilevel I2C interfaces, central office switching, telecommunication and data communication equipment, etc
On-board modules
ADM3260 dual I2C isolator
Key Features
up to 150 mW output power
Interface
GPIO,I2C
Feature
No ClickID
Compatibility
mikroBUS™
Click board size
M (42.9 x 25.4 mm)
Input Voltage
3.3V or 5V
Category
Click Boards
This table shows how the pinout on I2C Isolator 2 click corresponds to the pinout on the mikroBUS™ socket (the latter shown in the two middle columns).
| Notes | Pin | Pin | Notes | ||||
|---|---|---|---|---|---|---|---|
| NC | 1 | AN | PWM | 16 | PDIS | Power disable | |
| NC | 2 | RST | INT | 15 | NC | ||
| NC | 3 | CS | TX | 14 | NC | ||
| NC | 4 | SCK | RX | 13 | NC | ||
| NC | 5 | MISO | SCL | 12 | SCL | I2C Clock | |
| NC | 6 | MOSI | SDA | 11 | SDA | I2C Data | |
| Power supply | +3.3V | 7 | 3.3V | 5V | 10 | +5V | Power supply |
| Ground | GND | 8 | GND | GND | 9 | GND | Ground |
| Designator | Name | Default Position | Default Option | Description |
|---|---|---|---|---|
| JP1 | VIO SEL. | Left | 3V3 | Power Supply Voltage Selection 3V3/5V, left position 3V3, right position 5V |
| JP2 | VIO ISO | Left | 3V3 | Isolated Power Supply Voltage Selection 3V3/5V, left position 3V3, right position 5V |
| Designator | Name | Type | Description |
|---|---|---|---|
| CN1 | SCREW TERMINAL | VCC, GND isolated connection. | |
| CN2 | SCREW TERMINAL | SCL SDA isolated connection |
We provide a library for the I2C Isolator 2 Click as well as a demo application (example), developed using MIKROE compilers. The demo can run on all the main MIKROE development boards.
Package can be downloaded/installed directly from NECTO Studio Package Manager (recommended), downloaded from our LibStock™ or found on MIKROE github account.
Library Description
This library contains API for I2C Isolator 2 Click driver.
Key functions
i2cisolator2_write This function writes a desired data to I2C bus.
i2cisolator2_read This function reads a desired number of data bytes from I2C bus.
i2cisolator2_set_slave_address This function sets the slave address.
Example Description
This example showcases how to initialize, configure and use the I2C Isolator 2 Click. The Click provides I2C lines and power isolation for slave devices. In order for this example to work, you need the EEPROM 3 Click.
 void application_task ( void )
 {
     uint8_t read_buf[ 100 ] = { 0 };
     if ( I2CISOLATOR2_OK == eeprom3_write_page ( EEPROM3_MEMORY_ADDRESS, EEPROM3_DEMO_TEXT,
                                                  strlen( EEPROM3_DEMO_TEXT ) ) )
     {
         log_printf( &logger, " Demo text message is written to EEPROM 3 click!rn" );
     }
     Delay_ms ( 1000 );

     if ( I2CISOLATOR2_OK == eeprom3_read_page ( EEPROM3_MEMORY_ADDRESS, read_buf,
                                                 strlen( EEPROM3_DEMO_TEXT ) ) )
     {
         read_buf[ strlen( EEPROM3_DEMO_TEXT ) ] = 0;
         log_printf( &logger, " Read data: "%s"rnn", read_buf );
     }
     Delay_ms ( 1000 );
 }
The full application code, and ready to use projects can be installed directly from NECTO Studio Package Manager (recommended), downloaded from our LibStock™ or found on MIKROE github account.
Other MIKROE Libraries used in the example:
Additional notes and informations
Depending on the development board you are using, you may need USB UART click, USB UART 2 Click or RS232 Click to connect to your PC, for development systems with no UART to USB interface available on the board. UART terminal is available in all MIKROE compilers.
This Click board™ is supported with mikroSDK - MIKROE Software Development Kit. To ensure proper operation of mikroSDK compliant Click board™ demo applications, mikroSDK should be downloaded from the LibStock and installed for the compiler you are using.
For more information about mikroSDK, visit the official page.
$3.60

$889.00

$35.00

$95.00

$549.00

$299.00
$29.00
$29.00
$6.59
$3.60

$119.00
$449.00
$349.00
$349.00
$349.00

$299.00
$269.00
$249.00

$209.00